Showing posts with label cake. Show all posts

Thursday, April 18, 2013

I'm Late..I'm Late...for a very important date:)!

Hi Ya'll!
So I'm not late for an important date...lol...but that little verse does set the tone for my blog post in that I will be talking about Alice in Wonderland! So I adore the original Alice in Wonderland like I'm sure most of you do.. I can't say the same about too many of the remakes that has made their way to the big screen..but I did most enjoy Tim Burton's remake of Alice in Wonderland with Johnnie Depp. I also love how Wonderland is one of the many different worlds in the series Once Upon a Time (oohhh I just love that show). So I thought it would be fitting to do a post on the theme of Alice in Wonderland.
Now if you are into cake decorating like I am then.. you have surely seen the spike in the number of cakes that have popped up on Google over the last year in that theme. I don't know the reason why but I love to see the different interpretations done in cake:)


Now this one for instance (no I didn't do this one...but mine is coming..hehehe) is the typical Alice in Wonderland theme cake you would see...with Alice falling into the rabbit hole and the clock for the late bunny. The stripes represents the Cheshire cat. This cake was done by Lilo Cakes .


Or you will have some like this.. that just takes a few elements like the cup from the Mad Hatter's tea party and Cheshire cat and completely make something different. This cake is ultra feminine while staying true to the theme of Alice in Wonderland. It also has a extra something in that it is in the topsy turvy style. This cake is by Design Cakes on Flickr.

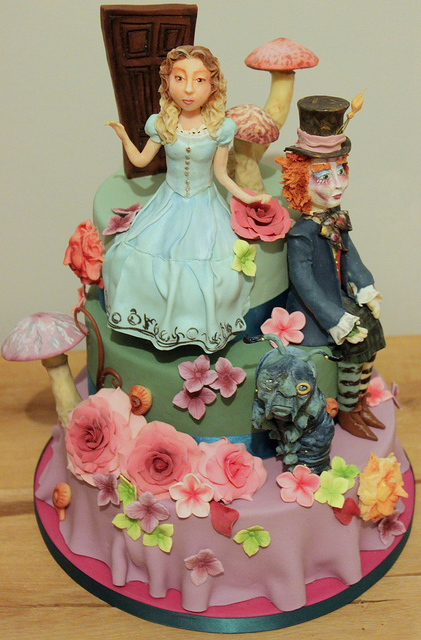
Or you can have great artistic version like this. I saw this one and fell in LOVE with the characters on the cake. I love how the rest of the cake is an elegant background to the detailedness of the characters. I do figures on some of my cakes..but these are extremely well done. I want my figures to look like that when they grow up:) The figures are very Tim Burton in style. This one was done by a designer across the pond, Sweet as Sugar Cakes in the UK is on Flickr as well.

So here is my version of Alice in Wonderland:)
As you can see mine has many classic characters of the movie like the Cheshire cat, the smoking worm and playing cards. This cake was topsy-turvy as well.. though not from this angle of the picture (trying to show off everything on the cake) and I will probably doing a sharper angle next time I do a cake like this but I do love the way everything came together on the cake. This was also for a baby shower which is why some of the colors are on the lighter scale. I also made "Alice" black since the mommy to be was black. I like to take personal elements of the person who the cake is for and put them into the cake. The most fun was making Alice and the top of the cake which is of course the Mad Hatter's hat:) The mommy to be loved the cake and everyone was so impressed with all of the characters I was able to get on the cake. Next time I would like to add either the Mad Hatter himself or the Queen of Hearts. Overall I am pleased and think I did a pretty good job... don't you???

Peace & Blessings


Wednesday, June 20, 2012

XBOX360 Cake

Good Evening Ya'll
   I don't know how I let so much time passed before I put up another post! I just happened to look at the last date and realize OMG it has been almost 2 weeks! So I am now back with new post:) So obviously from the title that the post about an XBOX360 cake that I did about 2/3 weeks ago for a local client. She ordered the cake for her son's birthday. She said he loves XBOX and that he specifically likes the black one (not the white one:( I think that one looks better lol). So of course I told her no problem. About a year ago I did a PS3 cake (with the help of the hubby), so I knew if I can do a PS3 then I knew I could do the XBOX360. She also asked for the controller but it wasn't a very important part of the cake so I decided to work more on the XBOX part of the cake than the controller. Next time if I get an order for a bigger one, I will definitely had more detail but the key to being a cake decorator is to not spend sooo much time on a design that you don't make money from it. Meaning since this was a smaller order I can't spend the same amount of time on it that I would for a bigger order (more expensive order). The key is to price accordingly to how many hours you think it would take to decorate that particular order plus the ingredients/supplies needed to make the cake. If I had my way I would work longer on all of my cakes, but then I wouldn't make any money lol. So yeah below are some pictures I took before the hubby delivered the cake.
White Chocolate cake with Vanilla Buttercream filling. 
Peace & Blessings
Kima

Thursday, May 31, 2012

The Preakness Winners Barn Party Cake

Hi Ya'll!

I am doing a quick post on the Preakness cake I did about 2 weeks ago for the winners of the Preakness held at Pimlico Race Track in Baltimore, Maryland. This cake was the biggest cake to date that I have ever done! It ended up serving about 300 people!!! And boy was this cake heavy!!! I can't tell you how much it weighed once it was completed but the hubby and I had a heck of time loading it into the van. It almost didn't fit out the front door of our house! We had to tilt it slightly sideways to get it to fit. At least I know what are the max dimensions I can fit through the door:)

I know some of you are thinking how did little ole me land such a big job..well it definitely goes back to making sure you please your clients. A client of mine, P, who I did her wedding cake last year, works for the Maryland Jockey Club (the organization that runs the Preakness). So she approached me back in the beginning of April and asked me if I would be interested in doing the Winners cake. She went on to say how she loved her wedding cake so much and how everyone raved about it that when she needed someone to do the Winners cake she thought of me first:) Of course I was very pleased that she thought of me instead of one of the local bakeries in Baltimore. So we talked over next couple of weeks about design and flavor. I had to send her some sketches and once she approved we were off to the races (lol)! She wanted a plain design with vanilla cake and vanilla buttercream in order to make sure everyone ate it. The final design changed slightly from the original but in the end she loved it and said all of her co-workers liked it and they will be using me from now on for the Winners cake! Such an exciting thing for my  business, we now have our first official corporate client:)

As you can see I did a lot of air brushing for this cake. I also made chocolate horse shoes that decorated the cake as well as fondant Black Eyed Susans.I had to include all 11 horses that were racing so those are the names scattered around the middle cake. The design is a lot plainer than what I normally do but she wanted to keep it simple for the first year and I am glad she did! The middle cake is a double stacked 12x18 airbrushed in brown. The 2 side cakes are 14, 10 and 8 inch rounds airbrushed in yellow. The signs on the top were made from fondant and had the Preakness 2012 logo on them. Each tier is wrapped in black ribbon.

My next post will be my carrot cake recipe and more information on my allergy free line:)

Peace & Blessings
Kima


Wednesday, March 28, 2012

PRIMP Anniversary Cake

Good Evening Ya'll!
I hope you guys have been having a good week so far..mine has been up and down but I am still blessed nonetheless so I will keep on moving :) So in my attempt to work backwards with the cake orders, this cake was done about 2 weeks ago. The cake was for the owner of PRIMP Agency here in York,PA. PRIMP Agency is an agency that is full service from putting together photo shoots to hair/make up. They do it all! So I asked the owner if she wanted a cake at her anniversary party in Baltimore, MD and of course she said yes! And on top of that she gave me free reign to do whatever I wanted to do as long as it stayed in the realm of fashion. So I was over the moon! I don't get to do that many fashion cakes, so I jumped at the chance to do something different. The cakes were white chocolate and vanilla bean. I also covered the cake in chocolate ganache which I am learning it works great with fondant and provide a super smooth surface (if you do it right) to work with. I wanted the cake to be fun with a slight sophistication to it so I made the color scheme gray, pink, yellow and some white. Ya'll know that I am in love with the pink/gray and white/gray combo so I used it all in this cake. I also added in some zebra print for some fun.

So as you can see I had way to much fun with this cake. I also hand molded all of the toppers. I love the way the dress form and dress came out. That was my first time doing something like that and I think I will do it again maybe even trying make a cake like that. I love the shoe and will be working on some more shoes to sell. Here is a close up of the top.

Also you will notice some feathers..yes a first for me and I will most definitely use them again on a cake. I want to do a wedding display cake with some feathers on it. I also used my new alphabet letters on this cake as well. And of course I added in one of my fantasy flowers in hot pink.

So that's it for now and another post is coming soon..
Until then
Peace & blessings

Friday, January 13, 2012

Strawberry Gluten Free Cake Tutorial

Good Evening Ya'll!
It's finally here! My first tutorial...and a gluten free one at that...how great is that! So if you guys didn't know that along with regular cakes and cupcakes, I make cakes/cupcakes for people with food allergies. My biggest food allergy group is those who are on a gluten free diet. So I do get request pretty regularly for gluten free cakes. So I decided to do a gluten free tutorial. Normally I would keep my recipes and such a business secret but since the recipe is already listed on the King Arthur's website, its not mine. If you look on their site under gluten free, you will see a recipe for a yellow cake. Now when you look at the recipe, its a pretty basic recipe in terms of gluten free recipes. So I use this recipe as a basis for my other flavors, just building upon what is already there using other gluten free ingredients.

In this case the cake was gluten free strawberry with gluten free vanilla buttercream filling. Now the biggest tip I can give before I start the actual tutorial is to make sure that all of baking items are GLUTEN FREE that includes the mixing bowl, mixer, measuring cups/spoons, etc. I have a separate set of equipment to use just for gluten free clients. You do not want to make any one sick from cross contamination. For some people, even the smallest bit of gluten can make them sick and that's the last thing you want to do is make someone sick. Now with that housekeeping done on to the tutorial!

As you can see from the picture, I start with gathering all the ingredients I need first to make what ever flavor cake I am making. I do this so I am not running around looking for ingredients while mixing the cake batter. Another tip is that I take out the milk and eggs and butter out of the fridge at least 30 minutes before I bake so they are at room temperature. So in the picture you have salt, sugar (store brand works fine), baking soda (make sure the label says gluten free on it, if not then buy one that does), King Arthur Gluten Free All Purpose Flour mix, Jello brand Strawberry Creme pudding mix (only Jello brand, DO NOT get STORE BRAND!!! Jello brand is gluten free made by Kraft), Strawberry extract and xanthan gum.  They don't sell xanthan gum in the grocery stores, I get mine from my local cake supply shop, but there are plenty of online places that you can purchase it from. Bob Red's Mill carries it as well as the Gluten Free Pantry has it as well.  Now you will notice that is the recipe they have something called Free King Arthur Cake Enhancer. I don't have that, so I leave it out, my clients like the cake just fine. If you can get your hands on it then go for it:) Also in the picture are my measuring cupcakes and spoons that used only for gluten free baking.
Here is my gluten free mixing bowl, measuring cup and hand mixer. Since I don't do gluten free baking in large numbers yet, I only use the hand mixer for now.
This is a picture of the butter and sugar mixed together. You want to make sure that thoroughly mix that butter and sugar together since this is the base of the recipe.
Next you want to add the eggs into the mixture, one at a time to make sure they are thoroughly incorporated into the mix. It should look something like the picture above.

This is the point where you add in the extract and pudding.


Once you do that, then you will add in the flour mix (flour, salt, baking powder and xanthan gum) and milk alternating between the 2. The batter will have slight pink color to it. If you want more a pink color you can add some pink food coloring to it because the pink color does bake out during the baking process.

I bake in the oven on 350. Now most you can go by the time in the recipe, which I never do. I like to baby sit my cakes to make sure they stay moist and don't over bake. So once I start to smell the cake, I keep checking it every 5 minutes until it springs back. I double check done-ness of the cake by putting a toothpick right into the middle of the cake.


Once the cakes have cooled, you can throw them in the freezer for an hour. Since gluten free cakes aren't as stable as cakes with gluten in them and crumble easily, the freezing helps leveling them out better and less mess.

Once leveled, I fill the cakes and let them sit overnight to settle before I start to cover them and decorate. This cake was just for a client of mine whose daughter was turning 2. She wanted a regular cake for everyone else and then a smaller one for a second one for herself. She told me I didn't have to decorate it, but I added some decorations to have it match the main cake.


So that is my first tutorial:) Let me know what you think...

Peace & Blessings
Kima

Wednesday, January 11, 2012

Super Mario Brothers Go Kart Cake

Hi Ya'll!
It seems like Super Mario Brothers is becoming popular again. This cake is my second Super Mario cake in the last couple of weeks. Not mention I have been getting inquiries about the Luigi and Mario 3D figures I placed up on my Etsy shop 2 weeks ago. Now I have about 5 different listings customers can choose from. Also now up in the shop is 2 characters from the cartoon Backyardigans; Pablo and Austin. Pablo is the penguin and Austin is the Kangaroo. I will be working on the other 3 characters in the coming weeks.

Back to the cake, this client of mine L, has been ordering all of kids cakes from me since last year. I think this is the 3rd or 4th cake I have done so far. I have noticed that each time the design of the cake gets more complicated which for me is a good thing because she is recognizing that I can do much more than she thought I could initially :) She always orders the same flavor combination 1/2 vanilla with oreo buttercream and 1/2 strawberry with vanilla buttercream. So this time was no different except the theme. This cake was for her son who turned 7 and he wanted a Super Mario Brothers theme cake. The twist was that he wanted Super Mario Go Kart theme. I am somewhat familiar with the game since the hubby plays video games so I had an idea, but I had to google the actual characters so I can see what the go karts looked like and how the characters sat in the go karts.

The cake was a 9x13 so I didn't have a whole lot of space to work with in terms on the number of characters I could put on the cake. I ended up with 3 though she wanted more and I had to show her way there was only 3 of them (which you will see with the picture). I love the way Mario and Luigi came out though Toad needs some work ( his mushroom cap was too heavy for his head..gotta find a way to make it lighter). Overall I am once again pleased with the cake and she was too.

My next post will the Gluten free tutorial I promised. This one was just faster to put up at the moment:)

Peace & Blessings
Kima

Sunday, January 1, 2012

Super Mario Brothers Cake

Hey Ya'll... Happy New Year!!!!


A new year brings new beginnings and new opportunities. A time to start over, start fresh; anew. I don't necessarily do resolutions because like 90% of people, I end up not doing them. However, my husband and I do write some goals we would like to achieve for the year. Of course on my list of goals this year is to continue to expand my business and hopefully have a plan of where I would like to move my business to. So that is my little blurb on the new year. On to caking:)

This blog is about a Super Mario Brother sheet cake I did last week for a new client. She told me she normally would buy a regular cake from Wal-Mart (gasp!) but decided this year since her son is getting older that she would get a custom cake made :) So she came over and we discussed what is would like in the cake. She immediately told me that her son loves Super Mario Brothers and she ordered some plastic characters to go on the cake. Now I don't like putting plastic characters on my cakes, it reminds me of the store bought cakes. But she was already tied to the idea so I just brain stormed with her to bring in the theme to the rest of the cake. So we decided on coins, the money boxes (as I call them) that the characters hit to make the coins come out. I guess you can tell that I don't play video games huh lol. Also some stars and clouds. She also wanted to stay in the color scheme of red, blue, yellow and green. Very primary color and perfect for a little boy.
Now everything was all set to go and she told me she would drop the characters for me to put on the cake. When she came by, she was a bit upset. I asked her why and she showed me. The characters she owed me we soo small and that would look lost on the cake. So I told her that I could do some of the figures for her to put on the cake but not all of them. One because it was Thursday afternoon and the cake was due the following evening and too some of them are a bit detailed for me to do right now. So I ended up making Mario, Luigi and a bomb character for her cake. I placed the other characters near them so they would still be on the cake but you would be able to tell that is was a Super Mario Brothers theme cake but the much bigger Mario and Luigi.


1/2 vanilla and 1/2 red velvet with vanilla buttercream tinted blue 

Here are some up close shots of Mario as well as the bomb that was on the cake. I think I did a pretty good job on both of them considering I just started doing 3D figures earlier last year. 
Mario


Bomb Figure


Well that is it for this post. Up next, my first tutorial making Gluten-free Strawberry cake. 

Peace & Blessings, 
Kima


Thursday, December 29, 2011

Christmas!


Hey Ya'll!

I never really loved Christmas the way I do now that I have my son. To  me Christmas always was and still about Christ being born. But now that I have son, its so much fun picking out gifts for him and my in laws. This year the Christmas orders was kind of quiet and I liked it because we went to New Jersey to spend Christmas with the in laws.


But before we left, I made some cupcakes for my church choir. We had a choir fellowship the Thursday before Christmas. I decided to make red velvet cupcakes (I think red velvet is Christmas-y since of course its red). I put fondant gingerbread men and candy cane pops as cupcake toppers.

 
The second cake I did was for my mother in law. It was kind of an exchange of sorts. My husband is Haitian American and his mother is Haitian. She immigrated to the US before my husband was born, so she has been here for quiet a while and is now an American citizen :) but she only cooks traditional Haitian food which I can't cook. So any time we go visit my husband always request what he wants to eat while he is there.. well fast forward 4 years and I have developed a taste for Haitian food as well. So this year I made a request of my own through my sister in law. So in exchange for cooking my favorites, I made her a Christmas theme carrot cake. The carrot I made was the traditional carrot cake but without the raisins in it and I switched the filling. So instead of a regular cream cheese icing, I made a mascapone cheese buttercream. I haven't worked with that kind of cheese before so I was a bit worried as to how she would like it, but apparently I had nothing to worry about because she and everyone else LOVED it! I was soo pleased.


The last cake I made was for a Christmas birthday. I hope you guys follow me on this one but my god daughter's older sister's son (my god daughter's nephew) was born on Christmas. He turned 5 and loves the Cars movies. So his grandmother ordered a small Cars themed cake for his birthday with a Lightning McQueen figure on top. I was pleased with how the cake topper came out since I haven't done a car of type before. I know what I would do differently now, but for my first try he was pretty cute. The cake was vanilla with a chocolate pudding filling (since the birthday boy doesn't like fillings).


So that was Christmas caking this year. It was kind of nice not having 20 cakes to make while trying to wrap gifts and hiding toys away from my 2 year old:)

Peace & Blessings,
Kima